This post won’t apply to many since the majority of Dynamik users are running Dynamik in HTML5 mode since that has been the default setting for many years now. But for those who do in fact have Dynamik set to XHTML instead, here’s what you need to know.
How Do I Know If Dynamik Is Set To XHMTL Mode?
There are several ways to know this. If you go to your Dynamik Settings > General Settings and look under the “Genesis HTML5 Markup” section you can see if the “Activate Genesis HTML5 Markup” setting is selected. If it’s not then just check that box, save your changes, and then you’re now running in HTML5 mode.
Other signs would be if Genesis itself won’t auto-update (this is because Genesis is set to not allow for auto-updates when the Child Theme is running in XHTML mode), or if you manually update Genesis and then your front-end looks like a toddler did your front-end DEV work. That’s because Genesis now ONLY runs in HTML5 mode and so your Dynamik XHTML CSS code will not properly style the Genesis HTML5 markup.
How Do I Update Dynamik To Accommodate HTML5 Markup?
I just mentioned above how to change the actual Dynamik setting, and in many cases this will be enough. But in some instances you will update this setting to HTML5 and your front-end design will clearly fix itself, but might not have all the nice refinements that you had worked so hard to implement. In these cases it’s likely that you’re using some XHTML elements in your Dynamik Custom CSS, which are now not being applied to your theme design.
To fix this you’ll need to replace the XHTML markup with the appropriate HTML5 markup in your Dynamik Custom CSS textarea (or wherever you are using XHTML elements in your CSS code). Below is a list of the most common XHTML Genesis elements and their HTML5 counterparts.
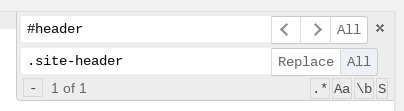
The easiest way to make these Custom CSS changes is to use the Find and Replace tool built into the Ace Editor script used in the Dynamik Custom CSS, Functions, and JS textareas. You can enable this feature by pressing CTRL (or CMD if you’re on a Mac) + F on your keyboard. This will slide down the Find feature at the top-right of your Custom CSS textarea. Then click the “+” symbol at the bottom-left of that Find feature, which should slide down the Replace feature as well. Then just paste in an XHTML element in the Find text field and hit ENTER on your keyboard to see if any of such elements exist in your Custom CSS. If so then paste in the HTML5 counterpart to that XHTML element and click the “All” button for the Replace field. This should replace ALL instances of your XHTML element with its HTML5 counterpart. Then just wash, rinse, repeat, until you’re confident all have been replaced (or you’ve gone through the list I’ve provided).
Once you’ve done all this you should find that your front-end is now looking like it once did, prior to the Genesis update, but now with HTML5 active and all your Custom CSS reflecting this change.
Follow & Share: