Over the years there have been many ways to tackle this particular need, but with the recent addition of the Gutenberg Editor to the WordPress platform and the unique way that the Genesis Framework handles things like hiding unwanted elements and tweaking styles to expand certain pages to full width, I thought it would be nice to provide an updated solution.
In the past we would likely see a custom template solution that uses some remove_action PHP code to hide various elements like the page title and breadcrumbs, as well as setting the page to a full width content layout and adding a custom body class, but now this can all be done through the Genesis page options. So why not just scrap the template idea and just tweak some options and then add a few lines of Custom CSS? Well, I believe that was kind of the point behind adding these new pages options to Genesis and so that’s what we’ll do!
In this example I’m using the Beaver Builder Page Builder to create a landing page or static homepage style page and I’ve simply used one of their default templates to build out the page content and design. So now we just need to get Genesis out of the way and let our Page Builder roam free in the confines between the header area and the footer.
To do this we first need to edit our page and then click the little Genesis icon at the top-right of the page editor page, revealing the Genesis page options. From here we just need to check those three “Hide” option boxes, select the “Full Width Content” layout (unless of course your default layout is already set to a full width layout), and then add a custom body class that we can use to focus our Custom CSS on so that we don’t affect the rest of our site. That body class can be anything you like, but in our example I chose “builder-page”, which will match the Custom CSS used in this tutorial.
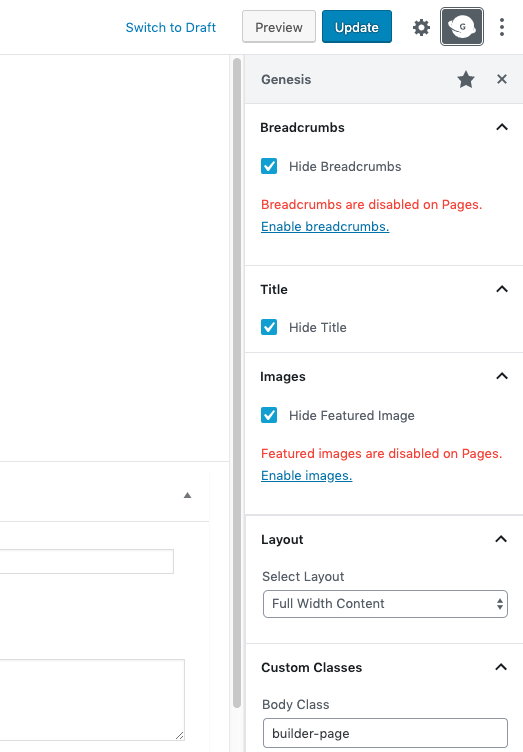
Now we can save our changes in our page editor page and then view the front-end of our site. We should now have zero sidebars, our unwanted elements hidden, and our custom body class tacked onto the end of our body tag, though that part’s hidden, of course. So now it’s just a matter of adding a few lines of Custom CSS and you should then see your page go truly full width and your Page Builder content display as intended.
The Custom CSS code for this tutorial can be found HERE.
You can either paste that code into the WordPress Customizer’s “Additional CSS” textarea, or if you want to add it directly to your Genesis Child Theme (which is more of a “Genesis” kind of thing to do), then you can either add it to the end of your Child Theme’s style.css file using FTP or a WP DEV Plugin such as Themer Pro or Instant IDE. In the example below I’m actually using our Genesis DevKit Plugin to add this CSS code directly to my Genesis Child Theme using its real-time front-end style editor.
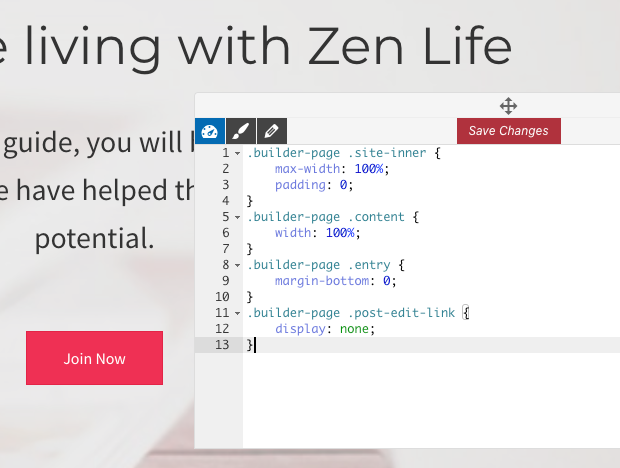
What this CSS code does is simply force the various content-containing elements to span the full width of the page through 100% widths and zeroed-out paddings and margins. That’s about it. From there the Page Builder Plugin can do its thing without having to fight the framework theme for needed space.
See this tutorial in action through the following screencast:
1 comment on “How To Make Your WordPress Page Builder Pages Full Width When Using The Genesis Framework”