The past few months have been busy for Cobalt Apps. New Plugins have been released, and as of a few days ago our flagship products were updated with notable new features and refinements. And in all the hustle and bustle I wanted to make sure that these new Plugins get the spotlight for a moment to ensure that our members not only know about them, but understand how they might benefit their WordPress endeavors. So let’s take a look at these new tools and see what they have to offer.
The FE CSS Builder Plugin
 This Plugin is essentially the completely re-designed Front-End CSS Builder tool found in Dynamik and our two Extender Plugins, but separated into its own independent Plugin form. It’s also compatible with multiple themes including the Genesis Framework, Beaver Builder Theme, GeneratePress Theme, and the Twenty Sixteen and Twenty Seventeen default WordPress Themes. It purposefully does not include an actual style editor (i.e.. a way to save style changes to the site), but instead either relies on its perfect integration with Child Themer (which I’ll explain in a moment), or the use of either the built-in WordPress front-end Customizer CSS feature or the many other possible Custom CSS solutions found in various Themes and Plugins.
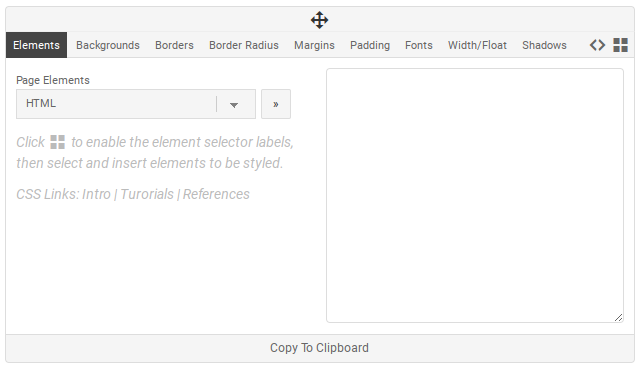
With this simple, yet extremely useful and intuitive design customization tool, you get quick-n-easy access to the various major elements found in the active compatible theme, providing you with all the controls needed for tweaking those various parts of your pages. Simply pop-up the tool on the front-end of your site, click the element selector icon, then click on the appropriate “paintbrush” icon in the area you want to style, and finally use the elements menu to scroll through possible elements, watching those areas highlight on hover. Once you’ve found the element in question you just click a button to create the appropriate element code and start building out those styles with the provide CSS options. And as you build your styles you get to see those changes in real-time. Then once satisfied with the changes you can simply click the “Copy To Clipboard” button and then paste those styles into whichever style editing tool you’ve chosen.
FE CSS Builder is not only great for creating your custom styles, but is also a wonderful learning tool. Since you can play around with your site’s design without actually affecting anything for your visitors, and since FE CSS Builder creates the CSS code in the same way that the original theme developer would, it helps those who are new to CSS become more comfortable with this kind of coding. And as I said, for those who want to quickly turn their CSS tweaks into live design changes, the Child Themer Plugin is a perfect companion.
[buy_fe_css_builder_button]
The Child Themer Plugin
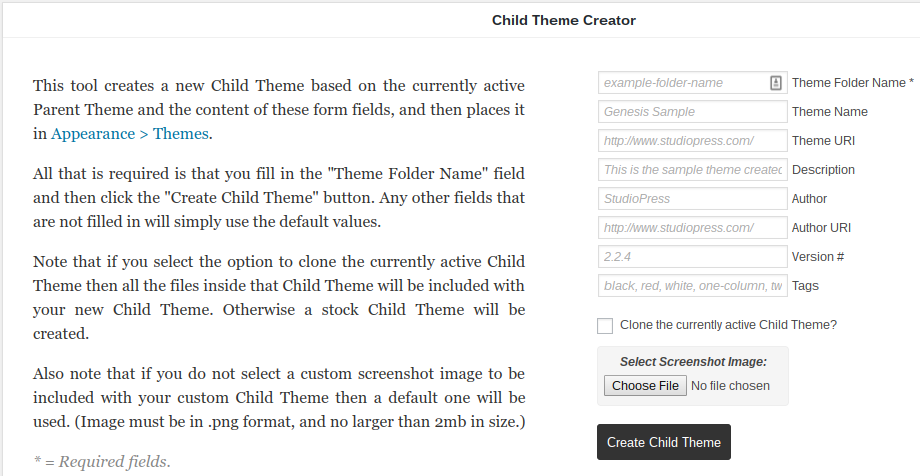
 Child Themer is kind of two Plugins in one, with a powerful code editor tool built-in, as well as a Child Theme creator. I believe the best way to describe Child Themer is to provide a simple use-case scenario. First, let’s say that you’re using one of the many compatible WordPress Theme Frameworks like Genesis, Beaver Builder, or GeneratePress. In this case you’d be wise to start off with a custom Child Theme for good-practices development, providing you with customization compartmentalization as well as auto-update protection. So you activate the Child Themer Plugin and go to the Child Creator admin page and use the provide form to create your custom Child Theme, including your own custom folder name, theme name, version number, author info, etc… Within a second or two after clicking the “Create Child Theme” button you’re provided with a message notifying you that your custom Child Theme has been successfully created and ready for activation. You click the provided link that takes you to your Appearance > Themes page and activate your newly created custom Child Theme from there (Child Themer creates your custom Child Theme inside the themes folder so there’s no need to download and then upload your newly create theme).
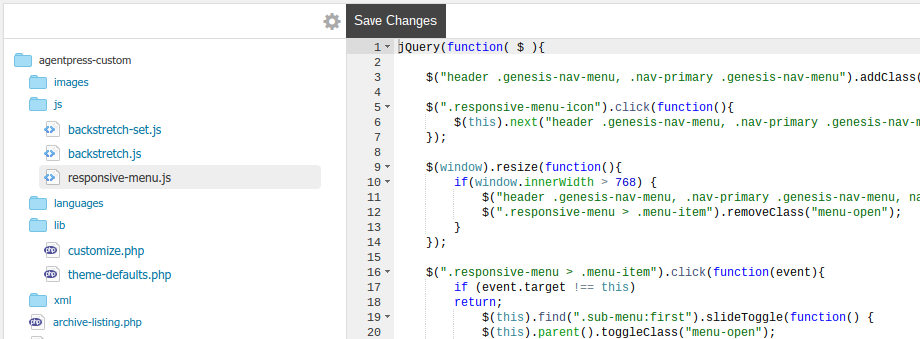
 Once activated you’ll see a Child Editor section inside the Child Themer admin area (and even an Parent Editor if enabled in the Child Themer settings page). You click on the Child Editor page and are presented with a full blown development environment, with full access to your Child Theme files and the awesome Ace Editor ready to hack away at some code. You decide to make a few tweaks to your functions.php file and then decide to create a custom version of your Parent Theme’s 404.php page. So you click over to the Parent Theme Editor, locate the 404.php file, click the “Copy” button above the Ace Editor, and then click back over to the Child Editor where, assuming you’ve enabled the “Advanced File Editor Controls” under your Child Themer Settings page, you create a new 404.php file and paste in your copied code. Now you tweak that code to meet your specific needs and then save your changes to have Child Themer write them directly to the file inside your Child Theme folder (no database interaction needed). But wait, after clicking “Save Changes” you receive a message that there is a parse error in your code and that you need to fix that first before Child Themer will actually write the code to your Child Theme. Sure enough, you left off a closing semi-colon which caused the error. You fix your code and then click “Save Changes” again, this time getting a “File Updated” message.
Now you’re ready to start tweaking your Child Theme’s stylesheet. And though you could do this through the Child Editor section, you prefer to pop your styles onto the front-end of your site so you can see your changes in real-time. So you enable the Front-End Style Editor in your Child Themer Settings area and then refresh the front-end of your site. Now you’re presented with a <code> button at the top-right of the page which you click to pop-up your Child Theme’s stylesheet. Now you start locating various elements using the Ace Editor’s powerful Find & Replace tool and tweak away, seeing the adjustments take effect as you type. Then once you’re satisfied with your tweaks and you’re ready to make them live you click “Save Changes” to have Child Themer write them directly to your Child Theme’s style.css file.
Now, let’s say that you’re able to accomplish a lot this way, but wish you had a little more help with locating the appropriate elements and creating the actual CSS code. Well, you could use your browsers inspector tool (e.g.. FireBug or Chrome Inspector), and in many cases that’s sufficient. But for many of you a more “made for the framework” solution would help tremendously and save you a ton of time. This is where the above mentioned FE CSS Builder integration comes in beautifully! So you install and activate the FE CSS Builder Plugin and now you notice a little paintbrush icon at the top right of your Front-End Style Editor box. You click that and BOOM, your FE Style Editor perfectly swaps out with the FE CSS Builder. So you go to work with the FE CSS Builder, finding the appropriate elements and styling away. Once you’ve built-out some styles the way you want them you click the “Copy To Clipboard” button and then simply click the provided <code> icon to swap back over to the FE Style Editor to paste-in and save your CSS code.
Now at this point you may be on a live site and want to either keep Child Themer active for continued customization or you could simply de-activate it if you’re done customizing your Child Theme’s code. Or, let’s say that you were on a dev site, creating a custom Child Theme for a client and are ready to transfer the theme over to their live site. You would then click over to the Child Creator admin page and click the “Download Child Theme” button to have Child Themer zip up and download your active Child Theme, ready to then be uploaded to your client’s live site.
[buy_child_themer_button]
Should I Buy These Plugins?
One thing I appreciate about our members is their loyalty and trust. Many of you guys will buy anything I produce, trusting that it will be useful, reliable, and a solid value. I can’t emphasize enough how much I appreciate this fact. But sometimes this zeal leads to purchases for products that really just weren’t meant for certain users or their particular needs or skill-set. So let me see if I can’t more accurately clarify who these Plugins were developed for and therefore what kind of user would best benefit from their presence in their web design tool box.
First, I believe that my use-case scenario above will provide a good amount of clarity as to how these Plugins will be used, but it’s important to know a few other bits of information. One thing to note is that this new FE CSS Builder Plugin is essentially built-in to Dynamik Website Builder as well as both the Genesis Extender and Beaver Extender Plugins. So if you use either of those for all of your sites then you wouldn’t benefit from having FE CSS Builder in it’s own independent Plugin form. Also, note that Child Themer is not compatible with Dynamik Website Builder because Dynamik itself is a Genesis Child Theme and yet not in the conventional form. In other words, you wouldn’t want to directly edit the Dynamik files, so Child Themer would be of no use with Dynamik active (nor would it’s features be accessible while Dynamik is active). Having said this, since Dynamik can be used to create custom Genesis Child Themes itself, you may find it useful to customize and then create the Child Themes with Dynamik and then later edit those exported Child Themes with the Child Themer Plugin. But of course I can’t tell you if your workflow would benefit from this kind of combo.
Also, even if you could in fact use and even benefit from Child Themer you need to keep in mind that it is all about custom coding. So if you don’t want to touch any code then it’s certainly not for you. But if you do in fact play with code when customizing your websites, or even just do some copy/paste coding and tweaks here and there, it can still be a time saver and provide a solid, professional environment for your coding endeavors.
Simple Pricing
One last thing to note about these two Plugins is that they have a simple one-price, unlimited license, purchase option. So instead of three tiers of license options and pricing, they simply come in “Unlimited” form at a single price point. I did this mostly to keep these Plugins as simple as possible, even down to the purchase experience. So if you decide either of these Plugins are worthy additions to your WP dev toolbox you’ll have no more decisions to make, except whether or not to buy both. 🙂
Follow & Share: